Savanna · reference rebuild
Lion Perler Bead Pattern
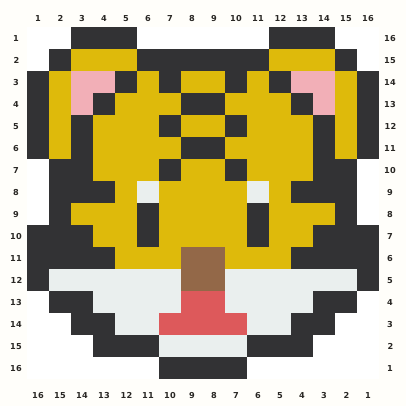
A compact lion head uses a split burnt-orange crown, tawny ears, two peach highlights, paired black eyes, a white-and-brown muzzle and a three-bead mane tip.
Edit this pattern online and export a PNG or print-ready PDF for free.
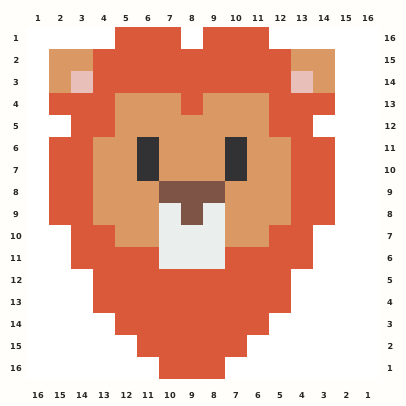
Perler palette · codes hidden · closest screen-color matches
Beige cells are empty pegs; white cells are beads. Brand codes use the closest CIE76 screen-color match from this source palette. Check important shades against physical beads before building.
Perler bead material list
Exact per-color counts for the 16×16 grid, so you can sort cups before you start. Switch the brand above to remap codes, colors and totals on this page.
- Spice
P21296 beads - Butterscotch
P9049 beads - Peach
P332 beads - Black
P184 beads - Gingerbread
P2504 beads - White
P018 beads
Making notes
The crown notch is true background, while the four eye cells are opaque black beads. Recheck the one-left and two-right padding columns after any copy or palette conversion. The active lion remains 13 columns wide and touches both the first and last final rows.
Sunny Lion provides a small lion Perler bead pattern for makers who prefer a clear head badge over a larger seated animal. The 16×16 chart preserves the open crown notch, broad tawny face, paired vertical eyes, layered muzzle and downward mane taper. Its 163 beads make it practical for a short workshop or first coordinate build, while six roles keep the face from becoming a flat orange disk. The selected grid remains editable, recolorable and ready for export with every transparent gap and padding column documented.
Start with the two three-cell mane groups on row 1 and keep column 8 empty between them. Extend the burnt-orange crown through rows 2–3 while placing the tawny ear ends and the only two Pale Peach cells at row 3 columns 3 and 13. Form the face opening on rows 4–5, then add the two vertical black eye pairs on rows 6–7. Build the three-cell brown muzzle bar on row 8, place its brown center and white side cells on row 9, and continue through the two three-white-cell rows before tapering the mane to row 16. The lion’s visual axis is column 8, but the final square has one blank padding column on the left and two on the right. Do not shift the active 13-column motif to make those margins equal. Row 1 column 8 is a real empty notch, not a missing mane bead. Keep both eye columns at 6 and 10 on rows 6–7, and retain the Pale Peach cells only at row 3 columns 3 and 13. The mane ends at columns 7–9 on row 16, so a one-peg shift is easy to spot at the tip.
Pattern layout and bead count
The occupied bounds are 13 columns by 16 rows. The final 16×16 matrix adds one blank column on the left and two on the right, with no added rows. Occupied mane cells appear on rows 1 and 16, and the active horizontal range is columns 2–14. All 163 beads fit comfortably on one standard 29×29 square pegboard. Copy the final coordinates rather than centering the lion on the available pegs, and do not fill the crown notch as extra framing. Checkpoints: Row 1: Burnt Orange is present only at columns 5–7 and 9–11; column 8 stays blank between the crown groups. Row 3: the only Light Peach cells are columns 3 and 13 inside the two tawny ear ends. Rows 6–7: Black forms two vertical eyes at columns 6 and 10, for four black beads total. Muzzle: Brown fills R8C7–C9 and R9C8; White fills R9C7 and C9 plus R10C7–C9 and R11C7–C9. Row 16: the mane terminates with Burnt Orange at columns 7–9; final columns 1, 15 and 16 are padding blanks.
Ways to customize this pattern
A harvest cub can use copper mane beads with biscuit-colored face beads; a storybook version can use burgundy, apricot and ivory. Keep the empty crown notch, paired eye columns, four-cell brown muzzle and 9–9–7–5–3 lower taper unchanged.
Use 96 Burnt Orange beads for the mane, 49 Tawny beads for the face, 2 Pale Peach beads for the ear highlights, 4 Black beads for the eyes, 4 Brown beads for the muzzle and 8 White beads for the lower muzzle. Burnt Orange should stay darker and redder than Tawny so the mane frames the face. Pale Peach needs a small lift from Tawny, while Brown must remain visible between White and Orange. Gold, rust or copper substitutions work if the same light-to-dark order remains clear.
Print and iron checklist
The separate crown groups, ear corners and three-cell mane tip have less support than the broad face and middle mane. Begin with a light pass over the center, then work toward the terracotta steps without dwelling on the edge cells. Keep the four black eye beads from spreading into the tawny face, and preserve the white gaps around the brown muzzle center. Turn the 16-cell sheet with a flat support rather than lifting it from the tip. Cool it under a weight, then inspect row 1, both ear highlights and the final three-bead point. Before export, verify the 16×16 coordinates, 163-bead total and the selected brand’s merged color counts against the on-page material list.
Project ideas for Sunny Lion
The compact head works as a birthday badge, classroom reward, backpack ornament or small bedroom-door crest. Its low bead count is suitable for a supervised group build, even though the six colors still provide useful sorting practice. For a wearable pin, add felt or foam behind the full mane and attach the hardware across the broad rows 11–13. Do not fasten through the three-cell tip or the crown notch. A small magnet can sit behind the tawny face, where it balances the unequal left and right padding. The chart also supports a short coordinate challenge. Builders can place the two Peach ear highlights, count the four eye cells, construct the 3+1 brown muzzle, and follow the lower mane through 9, 9, 7, 5 and 3 cells. On a banner, mount each lion on a backing circle rather than linking the fuse-bead tips directly. A printed name or age can sit below the badge without changing the grid. Before use, smooth the outer edge and confirm that the crown notch remains open, both eye columns are vertical, and the white muzzle has not fused into one solid area around the brown center. Store finished badges flat so the crown groups and bottom tip do not catch on other pieces.
The source grid uses g and the other design symbols only as internal color roles. The interactive chart replaces them with the selected manufacturer codes, while its material list combines any roles that map to the same bead color.