Fusing guide · Perler, Hama, Artkal and more
How to Iron Perler Beads
For standard Perler beads, cover the design with ironing paper and move a dry iron on medium heat in small circles without pressing down. Perler's starting point is about 10 to 20 seconds per side. Stop when the beads are joined but their centers are still open. Let the design cool, then lift it off the board, flip it and repeat. An adult should do the ironing.
By MyBeadPattern · Updated
What you need
- A household iron with the steam off.
- Ironing paper to protect both the beads and the iron. See ironing paper alternatives if you've run out.
- A flat, heat-resistant surface such as an ironing board, large enough for the whole pegboard.
- Your finished design on its pegboard. If you're following a printed chart under a clear board, remove it before ironing.
- A heavy, flat object (a large book works) to hold the design flat while it cools.
Safety: ironing should be done by an adult, never leave a hot iron unattended, and keep the room ventilated.
Step-by-step: ironing Perler beads
These steps follow Perler's standard method. Try it on a separate patch of spare beads first so you can check your iron without risking the finished design.
Cover with ironing paper
Place the pegboard on a flat, heat-resistant surface. Lay a smooth sheet of ironing paper over the whole design and pegboard. Keep the hot iron away from bare beads or pegs.
Set the iron
For standard Perler beads, start on medium with the steam off. Adjust on the spare patch: try a little more heat if the edges stay loose or less if the holes close quickly. For a different brand or bead size, check its settings.
Iron in small circles
Keep the iron moving without pressing down. Pass evenly over the center and edges, even if the whole design fits under the iron. For a larger piece, work in sections.
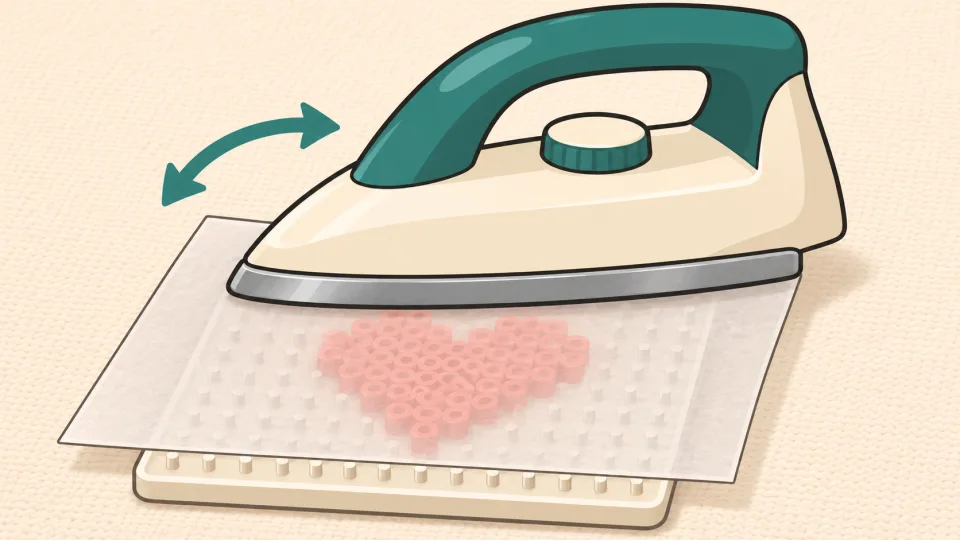
AI illustration: The paper stays between the iron and the beads. Check the melt
Set the iron upright away from the design. Check through the paper first. If you need a closer look, let the design cool briefly and lift one corner slowly. Check the edges too: the beads should be joined with their centers still open. Replace the paper before applying more heat.
Flip and iron the back
Once the first side has cooled enough to lift without bending or pulling beads loose, peel back the paper, lift the design off the pegboard and flip it. Cover the back with ironing paper and repeat. See one side or both sides for project-specific exceptions.
Cool under weight
After fusing the second side, lay the design flat and place a heavy book on it as it cools to reduce curling. See Perler's project instructions for this technique.
How melted should your beads be?
For a standard fuse, look for two things at once: neighboring beads have joined, and their center holes are still open. Check the edges as well as the middle. Open holes alone do not mean the beads are fused.
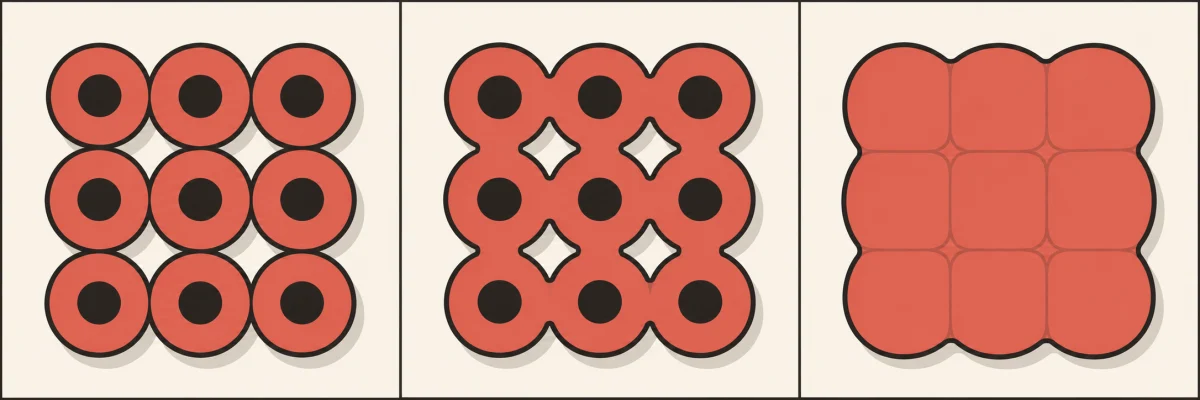
Stop at the middle example for Perler's standard finish. A flat fuse deliberately closes the holes. Leave them open if you need them for assembly; more heat will not reopen them. Continue with step 5.
How long and how hot to iron
Match the setting to the brand and bead size on your pack. The times below are starting points, not timers to follow regardless of how the beads look.
| Beads | Iron setting and time |
|---|---|
| Perler (5 mm) | Medium heat, dry iron. About 10 to 20 seconds per side in Perler's standard method; check the melt before adding time. |
| Perler Mini | Medium heat, about 10 seconds per side in Perler's mini pins instructions. Follow your own kit if it differs. |
| Hama Mini | Wool setting. Hama says to lift the iron when the colors are clearly visible through the paper. |
| Hama Midi (5 mm) | Cotton setting. Use the same visual check as for Hama Mini. |
| Hama Maxi | Linen setting. Use the same visual check as for Hama Mini. |
| Artkal | Artkal lists A as 2.6 mm Mini, not 5 mm Midi. Its general guide starts at medium heat but gives no per-side time by series. Follow the directions for your pack. |
| MARD Mini (2.6 mm) | Check the pack and test a spare patch first. This guide has no verified brand-specific setting or timing for MARD. |
If your iron uses dots instead of fabric names, check its manual rather than assuming a dot count. If you are printing a chart, check that the printed spacing matches your actual pegboard. The MARD 291 color chart covers the mini palette.
Iron one side or both sides?
Iron both sides for a standard Perler project. Fuse one side only when your project's instructions call for it. For example, Perler's pansy bracelet is fused on one side so it can be curved, while other pieces in the set use both sides.
For a display piece, Perler also suggests fusing the back a little more than the front. For larger designs, see the tape method.
Ironing paper alternatives
Use the ironing paper supplied with your kit if you have it. If you run out, craft retailer Rito lists baking parchment as a substitute. Keep a sheet between the iron and the beads every time.
- Skip wax paper and foil. Reynolds explains that the coating on wax paper melts under high heat. The fusing instructions linked here do not call for foil.
- Reuse intact ironing paper. Perler's standard method notes that the paper and pegboard are reusable.
No iron? Other ways to melt beads
If your design is already on a pegboard, leave it there until an adult can fuse it with a dry iron. Keep the pegboard out of the oven: Perler warns it will warp. The oven project in Perler's FAQ flattens loose beads individually, not an assembled design.
Ironing large and multi-board projects
For large designs made with standard Perler beads, Perler's tape method holds the design together while you remove the boards and fuse in sections. Perler does not recommend this method for Mini beads.
- Build on connected pegboards over a sheet of heavy cardboard on a flat, heat-safe surface. Our standard 5 mm charts can split into 29 × 29 grids; check the print scale against your own board.
- Press wide masking tape over the beads, overlapping strips slightly, and trim the edges.
- Sandwich with a second piece of cardboard, flip tape-side down, and lift the pegboards off carefully. Get a second person to help flip an extra-large design.
- Fuse the exposed side on medium with ironing paper. Work across the piece section by section, checking the melt rather than running the iron for a fixed total time. Weigh the design down while it cools.
- Flip again and peel away the tape. Cover the other side with ironing paper before fusing it. Weigh the design down again until cool.
Ready to plan a multi-board piece? Open the pattern maker and set a width of 58 or 87 beads for two or three boards across.
Fix common ironing problems
Look for what you see below. Some problems can be fixed on the same piece; others, such as closed holes or a warped pegboard, are easier to prevent on the next one.
| Problem | What to try |
|---|---|
| Loose edges or colors | Cover the loose area again and give it a little more time. If a spare patch still will not fuse evenly, Perler suggests raising the heat slightly. |
| Center holes closed | More ironing will not reopen the holes. Next time, use less heat or stop sooner, while the centers are still open. |
| Pegboard warped | Next time, lower the heat and keep the iron moving on the paper. Do not touch the bare pegs with the iron. |
| Piece curls | Weigh the piece down while it cools. Hama recommends a book to help it stay flat. |
| Beads lift with the paper | Wait a little longer before peeling, then lift the paper slowly. If beads come off, put them back on the board, cover them and re-fuse that area. See the Perler FAQ. |
| Plastic on the iron | Switch off the iron and follow its cleaning instructions before using it again. Next time, cover the entire area the iron will pass over with ironing paper. |
| Uneven fuse on a large piece | Check where the bead edges are still loose, then cover and touch up those areas. Work section by section next time. |
| Back is still loose | If the front holds together, flip the design, cover the back with paper and fuse that side. Check it before cooling the piece flat. |
Quick answers
FAQ
Can you iron Perler beads with a normal iron?
Yes. Perler's instructions call for a household iron on medium heat with ironing paper over the design. Keep the steam off.
Do you use wax paper or parchment paper?
Use ironing paper first. Baking parchment is the substitute listed by Rito. Skip wax paper: its coating can melt under the iron.
How long do you iron Perler beads for?
Start with about 10 to 20 seconds per side for standard Perler beads. Stop when the beads are joined with open centers, not just when the time is up. For Mini beads, see the settings table.
What is the best iron setting for Perler beads?
Start at medium with the steam off, then adjust. Perler's FAQ says to turn it up slightly if beads are not fusing and down slightly if the centers close.
Do you iron both sides of a Perler?
Usually, yes: front, cool, flip, back. Use one side only if your project's instructions call for it.
Can you reuse ironing paper?
Yes. Perler says the pegboard and ironing paper are reusable.
Why isn't my iron melting my Perler beads?
The beads may need a little more time or heat. Keep the iron moving, start by giving the loose areas a little more time, and use a spare patch to check before raising the setting.
Will the iron melt the pegboard?
It can warp if the temperature is too high, according to Perler's FAQ. Keep the iron on the paper, keep it moving, and avoid touching the pegboard directly.